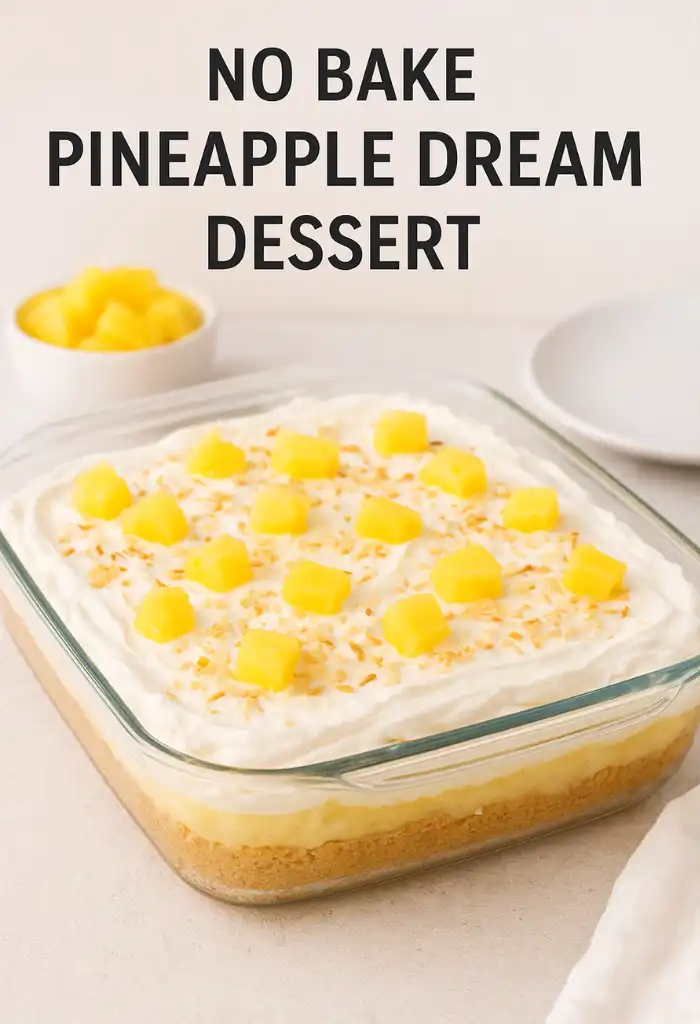
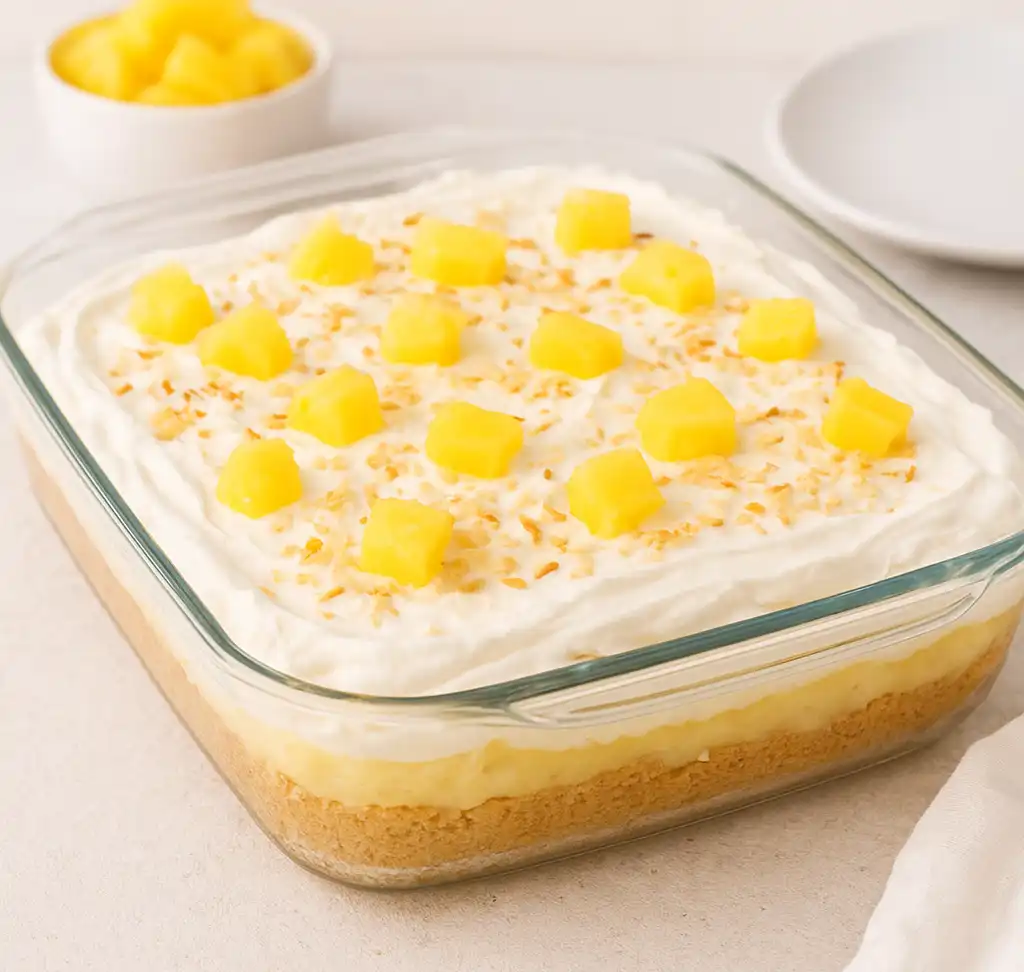
A dessert that manages to be both pleasantly light and indulgently rich has its own kind of magic. The Pineapple Dream Dessert is just such a masterpiece-truly tropical and an easy no-bake dessert for your summer get-togethers, holidays, or any time you want something indulgently sweet with no oven. The recipe is made up of layers of buttery graham cracker crust, fluffy cream cheese, and whipped topping filling with pieces of juicy pineapple that seem to burst with sunshine in every pleasant bite!
The icing on the cake is how simply it comes together. A handful of ingredients with a little effort will go into this beauty that looks like it was made in a bakery. The Pineapple Dream Dessert has resonated in many households for decades, and it should-“timeless,” “versatile,” and “absolutely drool-worthy.” So, whether you fancy yourself a home-baking guru or a total novice in the kitchen, you will appreciate how effortlessly this dessert goes.
What Is No Bake Pineapple Dream Dessert?
The No Bake Pineapple Dream Dessert is a very creamy tropical layered dessert that requires no baking at all. It is perfect for warm-weather gatherings or sweet cravings where there is no time to fuss with cooking or during the holidays.
It’s built in three irresistible layers:
A buttery graham cracker crust that gives a lightly sweet, crunchy base.
A fluffy cream cheese and whipped topping filling, mixed with powdered sugar for sweetness.
Sweet crushed pineapple folded into the filling for a burst of fresh, tropical flavor.
Chilled instead of baked, while the firmed layers are kept light and refreshing. Often topped with more whipped topping, extra pineapple, or even a sprinkle of coconut for a decorative finish.
The Pineapple Dream Dessert is one that has made a mark at potluck events, BBQs, family gatherings, and holiday spreads for generations because it is quick-prep and customizable, and both kids and adults enjoy it. It is that kind of dessert that disappears fast, always leaving people asking for the recipe.
Why You’ll Love Pineapple Dream Dessert
So many things make this Pineapple Dream Dessert a true dessert lover’s dream. First, it’s a no-bake recipe! That means it’s creamy and flavorful, all without the heat of the oven, especially on a hot day. What can be said about the delicious taste of buttery crust, the magical cream cheese layer, and juicy pineapple balanced with flavors and textures-sweet, sour, and slightly crunchy all at the same time? Then, there’s the make-ahead. You don’t want to have to rush making it the day you’re serving it, so make it the day beforehand, just to let all the beautiful flavors meld together!
It’s also versatile-perfect for potlucks, birthday parties, BBQs, or just a quiet evening treat. There are so many options and variations to consider. Pure coconut, crushed nuts sprinkled on the top, or a chocolate crust works just as fine as the original! And it’s an absolute favorite among all the kids and adults, so Pineapple Dream Dessert is a go-to for any occasion where smiles and second helpings are inevitable.
Ingredients
For the Crust
- Graham Cracker Crumbs (2 cups) – These form the base of your dessert, providing a sweet, slightly crunchy foundation that pairs perfectly with the creamy filling. You can crush whole graham crackers in a food processor or place them in a sealed plastic bag and roll with a rolling pin until fine.
- Unsalted Butter, Melted (½ cup) – Acts as the glue for your crust, binding the crumbs together. Melting the butter allows it to coat each crumb evenly, creating a crust that holds its shape but still melts in your mouth.
- Granulated Sugar (¼ cup) – Adds just the right touch of sweetness to the crust, enhancing the flavor without overpowering it.
For the Creamy Pineapple Filling
- Cream Cheese, Softened (8 oz) – This is the heart of your creamy layer, bringing richness and tang that balances the sweetness of the pineapple. Softening it ensures a smooth, lump-free mixture.
- Powdered Sugar (1 cup) – Sweetens the filling while keeping it silky and smooth. Unlike granulated sugar, it dissolves easily without creating a grainy texture.
- Whipped Topping, Thawed (8 oz) – Brings airy lightness to the filling, making it fluffy and easy to spread. Use it cold but not frozen for the best texture.
- Crushed Pineapple, Well-Drained (1 can, 20 oz) – The star of the show, adding juicy bursts of tropical flavor in every bite. Drain it thoroughly to avoid excess liquid that could make your dessert watery.
- Vanilla Extract (1 teaspoon, optional) – A subtle flavor enhancer that complements the pineapple and cream cheese beautifully.
For the Topping
- Whipped Topping, Thawed (8 oz) – A soft, creamy blanket that finishes the dessert and balances the textures of the layers beneath.
- Optional Garnish – A sprinkle of crushed graham crackers, toasted coconut flakes, or a few spoonfuls of pineapple can add texture, color, and extra flavor.
Step-by-Step Instructions
- Prepare the Graham Cracker Crust
- Crush the graham crackers into fine crumbs using a food processor or by sealing them in a ziplock bag and rolling with a rolling pin.
- Mix the crumbs with melted butter and sugar until they resemble wet sand.
- Press the mixture firmly into the bottom of a baking dish to form an even crust. Set aside.
- Make the Creamy Filling
- In a large mixing bowl, beat softened cream cheese until smooth and lump-free.
- Add powdered sugar gradually and continue beating until fully combined.
- Gently fold in the whipped topping until the mixture is light and fluffy.
- Add the Pineapple Layer
- Drain the crushed pineapple well to avoid excess liquid.
- Stir the pineapple into the creamy filling until evenly distributed.
- Assemble the Dessert
- Spread the pineapple-cream cheese mixture evenly over the prepared crust.
- For extra flavor, sprinkle with crushed graham crackers, nuts, or coconut.
- Chill and Serve
- Cover and refrigerate for at least 4–6 hours (overnight is even better) to allow flavors to meld.
- Slice, serve, and enjoy your refreshing Pineapple Dream Dessert!
Equipment Needed
- Refrigerator: Required to chill and set the dessert properly before serving.Mixing Bowls – Use one medium bowl for the crust and one large bowl for mixing the cream cheese filling.
- Electric Hand Mixer or Whisk: Helps beat the cream cheese and powdered sugar until smooth and lump-free.
- Measuring Cups & Spoons: Essential for accurate ingredient measurements to ensure the best texture and flavor.
- 9×9-inch Baking Dish or Square Pan: Perfect size for layering the crust and filling evenly.
- Rubber Spatula: Ideal for folding in the whipped topping gently without deflating it.
- Can Opener: Needed to open the crushed pineapple can easily.
- Fine Mesh Strainer or Sieve: Helps drain excess juice from the pineapple to prevent a soggy dessert.
- Spoon or Flat-Bottomed Glass: Useful for pressing the graham cracker crust firmly into the dish.
Tips for the Perfect Pineapple Dream Dessert
Making a Pineapple Dream Dessert is simple, but a few smart tips can take it from good to unforgettable. First, drain the crushed pineapple thoroughly—too much liquid can make the filling runny and cause the crust to become soggy. Press the pineapple in a fine-mesh sieve or between paper towels to remove excess juice. Second, use softened cream cheese for a smooth, lump-free filling; cold cream cheese tends to create clumps.
When pressing the graham cracker crust into your dish, make sure it’s packed firmly so it holds its shape when sliced. For added flavor, try using toasted coconut flakes or a pinch of cinnamon in the crust. Allow enough chill time—at least 4 hours, but overnight will give the best texture and flavor.
Lastly, for a pretty presentation, garnish your Pineapple Dream Dessert with whipped cream swirls, a sprinkle of graham crumbs, and small pineapple chunks. These little touches make your dessert look as dreamy as it tastes.
Variations You Can Try
- Pineapple Coconut Dream – Add shredded coconut to the filling or sprinkle toasted coconut on top for a tropical twist.
- Berry Pineapple Dream – Layer fresh strawberries, blueberries, or raspberries on top for a fruity, colorful touch.
- Nutty Crunch – Mix chopped pecans or walnuts into the crust or sprinkle over the topping for extra crunch.
- Chocolate Pineapple Dream – Drizzle melted chocolate over the dessert before serving for a decadent flavor contrast.
- Pineapple Cream Pie Style – Make the dessert in a pie dish with a deeper graham crust for a pie-like presentation.
- Citrus Burst – Add a bit of lemon or lime zest to the filling for a refreshing, tangy kick.
- Low-Sugar Version – Use sugar-free pudding mix, light cream cheese, and reduced-fat whipped topping for a lighter option.
Make-Ahead & Storage Instructions
- Make Ahead: Prepare the Pineapple Dream Dessert up to 24 hours in advance to let the flavors meld beautifully.
- Refrigeration: Keep the dessert covered tightly with plastic wrap or a lid to prevent it from drying out or absorbing fridge odors.
- Serving: Serve chilled straight from the fridge for the best texture and flavor.
- Storage: Store leftovers in an airtight container in the refrigerator for up to 3 days.
- Freezing: You can freeze individual slices wrapped tightly in plastic wrap and foil for up to 1 month. Thaw overnight in the fridge before serving.
- Note: Freezing may slightly change the texture of the whipped topping but the flavor remains delicious.
FAQs
1. Can I use fresh pineapple instead of canned?
Yes, fresh pineapple can be used as a delicious alternative to canned crushed pineapple in the Pineapple Dream Dessert. However, because fresh pineapple contains a lot of natural juice, it’s crucial to chop it finely and drain it very well to avoid making the dessert soggy or watery.
You can drain the pineapple by placing it in a fine-mesh sieve and pressing gently with the back of a spoon or letting it sit for a few minutes to release excess liquid. This step ensures the filling remains thick and creamy, maintaining the dessert’s perfect texture. Fresh pineapple also adds a brighter, more vibrant flavor, making your dessert feel even more refreshing and tropical.
2. Can I substitute cream cheese with something else?
While cream cheese is the classic choice for the creamy filling, there are some alternatives you can try if you want a lighter texture or have dietary restrictions. Mascarpone cheese is a great substitute that provides a similarly rich and creamy consistency but with a slightly sweeter and milder flavor.
Another option is using thick Greek yogurt or a combination of yogurt and cream cheese, which will make the dessert lighter but slightly tangier. Keep in mind that substituting cream cheese may alter the texture and flavor, so it’s best to experiment in small batches first. Whipped cream alone won’t provide the same richness, so combining it with one of these alternatives works best.
3. Is this dessert gluten-free?
The traditional Pineapple Dream Dessert isn’t gluten-free because it uses graham cracker crumbs for the crust, which typically contain wheat. However, you can easily make it gluten-free by substituting regular graham crackers with certified gluten-free graham crackers or using other gluten-free cookie crumbs such as gluten-free digestive biscuits or almond flour crust. Just ensure that the alternative crust binds well with the melted butter for the perfect base. This swap allows those with gluten sensitivities or celiac disease to enjoy this delightful dessert without worry.
4. How long does this dessert keep in the fridge?
When stored properly in an airtight container or tightly covered with plastic wrap, the Pineapple Dream Dessert will stay fresh and delicious in the refrigerator for up to three days. The flavors tend to deepen after resting overnight, making it even more enjoyable on the second day.
However, because the dessert contains whipped topping and fresh pineapple, it’s best consumed within this timeframe to avoid any texture changes or spoilage. After three days, the crust might begin to soften too much, and the whipped topping can lose some of its fluffiness.
5. Can I make this dessert in individual servings?
Yes! Making individual servings is a fun and elegant way to present Pineapple Dream Dessert, especially for parties or gatherings. You can layer the crust, creamy pineapple filling, and whipped topping in small jars, parfait glasses, or clear cups.
This method also makes portion control easy and allows guests to grab-and-go without needing to cut slices from a large dish. Just be sure to layer the ingredients evenly and chill the cups for several hours before serving so the dessert sets properly.
6. What if I don’t have whipped topping?
If you don’t have store-bought whipped topping like Cool Whip, you can easily make your own at home. Simply whip heavy cream with a hand mixer or stand mixer until it starts to thicken, then add a little powdered sugar and vanilla extract for sweetness and flavor. Continue whipping until you get stiff peaks—meaning the cream holds its shape when the beaters are lifted.
Homemade whipped cream gives a fresher, lighter taste compared to commercial whipped toppings and works beautifully in the Pineapple Dream Dessert. Just make sure to use it immediately or keep it chilled until assembling the dessert.
Explore More Dessert Recipes
https://dailytastebites.com/no-bake-key-lime-pie-recipe/
https://dailytastebites.com/german-chocolate-poke-cake-recipe/
https://dailytastebites.com/easy-pistachio-pineapple-cake/
https://dailytastebites.com/chocolate-chip-coffee-cake-recipe/
Print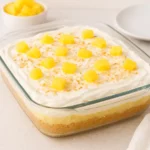
No Bake Pineapple Dream Dessert Recipe
- Prep Time: 20 minutes
- Rest Tiime: 8 hours
- Total Time: 8 hours 20 minutes
- Yield: 12 servings
- Category: Dessert
- Method: No-Bake / Chilled
- Cuisine: American, Southern
- Diet: Vegetarian
Description
This Pineapple Dream Dessert is a creamy, no-bake treat with a buttery graham cracker crust, fluffy cream cheese filling, and sweet pineapple topping. Perfect for summer gatherings, potlucks, or anytime you want a refreshing, easy-to-make dessert that’s light, fruity, and absolutely irresistible.
Ingredients
Instructions
- Prepare the crust – In a medium bowl, combine 2 cups graham cracker crumbs with ½ cup melted butter. Mix until crumbs are fully coated. Press the mixture evenly into the bottom of a 9×13-inch dish. Set aside.
- Make the cream layer – In a large mixing bowl, beat 8 oz softened cream cheese until smooth. Add 2 cups powdered sugar and mix until well combined. Fold in 8 oz Cool Whip until light and fluffy.
- Add pineapple – Gently fold in 1 cup of the well-drained crushed pineapple into the cream mixture, reserving the remaining pineapple for topping.
- Assemble the dessert – Spread the cream-pineapple mixture evenly over the prepared crust.
- Top it off – Evenly sprinkle the remaining crushed pineapple on top. Add chopped pecans or walnuts if desired for a crunchy finish.
- Chill – Cover and refrigerate for at least 4 hours (or overnight) to allow the flavors to blend and the dessert to firm up.
- Serve – Slice into squares, garnish with extra Cool Whip and pineapple tidbits if desired, and enjoy chilled.
Notes
- Use crushed pineapple well-drained to avoid a watery dessert.
- For a richer flavor, toast the graham cracker crumbs before making the crust.
- Chill overnight for the best texture and flavor blend.
- You can substitute Cool Whip with homemade whipped cream for a fresher taste.
Nutrition
- Serving Size: 1 serving
- Calories: 320kcal
- Sugar: 28g
- Sodium: 180mg
- Fat: 16g
- Saturated Fat: 10g
- Carbohydrates: 42g
- Fiber: 1g
- Protein: 3g
- Cholesterol: 35mg