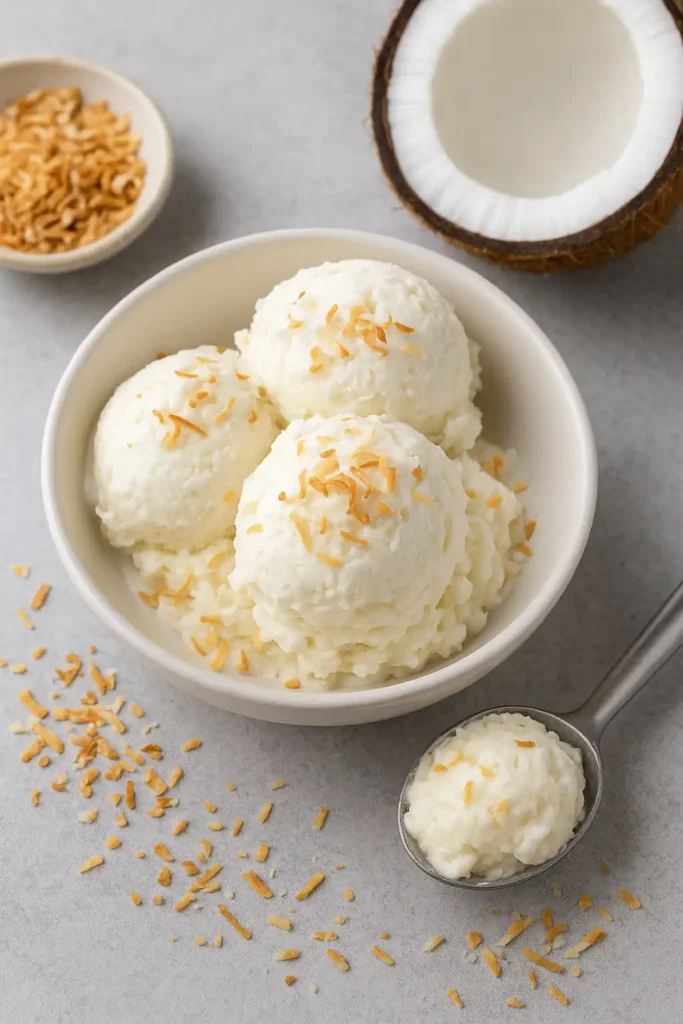
Ninja Creami coconut ice cream is rapidly gaining ground one of the best-loved homemade frozen desserts. Smooth texture, tropical flavor, and creamy consistency are what you crave from ice cream, without having to do the real churning. The best part is that it’s easy – need only a handful of ingredients and a Ninja Creami machine to create restaurant-quality dessert right in your own home.
Another charm of coconut ice cream is the rich flavor it has by nature; in addition, it has a flavor that goes well with fruits, chocolate, and sometimes spices. Besides, if the coconut milk is used in preparing it, it is made sure that it’s not dairy-based, so anyone could have this, including those who are lactose intolerant or prefer a plant-based lifestyle. The guesswork is taken out of ice cream making with the Ninja Creami, guaranteeing a silky texture every time.
If you’re looking for how to prepare a tropical, refreshing dessert that’s completely customizable and healthier than most commercial ones, then learning how to prepare Ninja Creami Coconut Ice Cream is for you.
Why Choose the Ninja Creami for Coconut Ice Cream?
In the poise of homemade ice creams, a Ninja Creami could very well be one of the finest makers for coconut-based recipes. Conventional ice cream makers would require rock salt, ice, and long hours of churning. With Ninja Creami, however, one freezes, processes, and enjoys-a wonderful deal simplified into three steps.
Ninja Creami offers something unique: the ability to create personalized frozen desserts. By selecting what goes into these frozen treats, you can control sweetness, creaminess, and even a little bit of nutrition. Vegan, high protein-this machine gives you the option of both busted or good!
As for coconut ice cream, the Ninja Creami ensures just the right natural fats of coconut milk or cream for a wonderfully scooped texture. No more ice chunks or grainy results! This is all about rich, tropical deliciousness.
The Ninja Creami, with its additional setting options for Ice Cream, Gelato, and Lite Ice Cream, allows you to play with different consistencies. A worthwhile investment if you want delicious homemade desserts without compromising on either quality or convenience.
Health Benefits of Coconut in Ice Cream
Coconut is not just about flavor; it is also a wholesome natural choice permeating every scoop of Ninja Creami coconut ice cream. Coconut milk is healthier because it substitutes traditional ice cream-dominant heavy cream with an excellent plant-based fat source. Such natural fats promote better digestion and quick energy release in the form of medium-chain triglycerides (MCTs).
Essential vitamins and minerals in coconut milk aid general health, which is another plus. Thus, those who suffer from lactose intolerance or follow a vegan way of life can still happily indulge in this beautiful coconut ice cream that has an intense creamy flavor.
Natural sweetness in coconut implies less sugar may be needed for other flavors on the menu compared with dairy ice creams. The flavors blend incredibly well with fruits such as pineapple, mango, and berries, encouraging a much healthier tropical twist. When frozen by the Ninja Creami, all those nutrients are retained but with great indulgent creaminess.
So, when you scoop into a bowl of Ninja Creami coconut ice cream, you’re not only enjoying dessert but also nourishing your body with wholesome ingredients.
Essential Ingredients for Ninja Creami Coconut Ice Cream
The beauty of Ninja Creami coconut ice cream lies in its simplicity—you don’t need a long list of complicated ingredients. However, selecting high-quality staples ensures your ice cream turns out rich and creamy.
Choosing the Best Coconut Milk or Cream
Coconut milk is the heart of this recipe, but not all cans are created equal. For the creamiest result, use full-fat coconut milk or coconut cream. The higher fat content prevents the ice cream from becoming icy and gives it a luscious texture. Avoid “light” versions, as they can water down the flavor.
Natural Sweeteners for a Healthier Treat
Instead of refined sugar, consider natural sweeteners like maple syrup, honey, or agave nectar. These not only enhance the coconut flavor but also add a subtle depth. If you prefer a sugar-free option, monk fruit or stevia blends can work well without compromising creaminess.
Optional Add-ins for Extra Flavor
The Ninja Creami lets you get creative. You can stir in shredded coconut for added texture, fold in chopped tropical fruits like pineapple or mango, or swirl in melted chocolate for a decadent twist. A pinch of vanilla extract or a dash of cinnamon also enhances the base flavor beautifully.
By choosing the right ingredients, you’ll guarantee that your Ninja Creami coconut ice cream isn’t just delicious but also tailored to your taste and dietary needs.
Equipment Needed for Ninja Creami Coconut Ice Cream
To make perfect Ninja Creami coconut ice cream at home, you’ll only need a few pieces of equipment. Most of them are kitchen basics, but the Ninja Creami itself is the star of the process.
- Ninja Creami Machine – The essential appliance that transforms your frozen base into creamy, scoopable ice cream. It comes with multiple functions like Ice Cream, Gelato, Lite Ice Cream, and Mix-In.
- Ninja Creami Pint Container with Lid – Used to freeze the base mixture for 24 hours before processing. Having extra pint containers is helpful if you want to prepare multiple flavors at once.
- Mixing Bowl – For whisking together coconut milk, sweeteners, and flavorings before pouring into the pint.
- Whisk or Hand Blender – Ensures all ingredients blend smoothly without lumps, especially when adding cocoa powder or nut butters.
- Measuring Cups and Spoons – For accurate ingredient ratios, which are important to achieve the right texture.
- Spatula or Spoon – Useful for scraping down the sides of the pint container or folding in add-ins.
- Freezer – A reliable freezer is key since the base must freeze completely solid before processing.
Optional extras include an ice cream scoop for serving and airtight containers if you plan to store leftovers.
With these simple tools, you’ll be fully equipped to make Ninja Creami coconut ice cream successfully every time.
Step-by-Step Instruction
Making Ninja Creami coconut ice cream is incredibly simple. The process involves just three stages: preparing, freezing, and processing.
Preparing the Ice Cream Base
Start by combining 1 can (13.5 oz) of full-fat coconut milk, ½ cup of natural sweetener (like maple syrup), and 1 teaspoon of vanilla extract in a bowl. Whisk until smooth. For an extra creamy texture, you can add 2 tablespoons of coconut cream. If you want to balance the richness, a tiny pinch of salt works wonders.
Freezing and Processing in the Ninja Creami
Pour the mixture into the Ninja Creami pint container and place it in the freezer for at least 24 hours. This ensures the base solidifies properly. Once frozen, insert the container into the Ninja Creami and select the “Ice Cream” function. In a matter of minutes, the machine transforms the frozen block into a silky, creamy dessert.
Adjusting Texture for Creaminess
If the ice cream looks crumbly after the first spin, don’t worry—that’s normal. Simply use the “Re-Spin” function to smooth it out. You can also add a splash of coconut milk during this step for extra creaminess. If you want to fold in add-ins, use the “Mix-In” function after the initial blend.
With these simple steps, you’ll have a perfect batch of Ninja Creami coconut ice cream ready to enjoy!
Variations of Ninja Creami Coconut Ice Cream
One of the best things about Ninja Creami coconut ice cream is its versatility. With a few tweaks, you can transform the base recipe into endless variations that cater to different tastes and occasions.
Vegan Coconut Ice Cream Twist
While the classic recipe is already dairy-free, you can make it fully vegan by ensuring your sweetener is plant-based. Agave nectar, maple syrup, or coconut sugar are excellent options. Add a splash of almond or oat milk for a lighter texture. For extra richness, blend in a handful of cashews before freezing.
Coconut Pineapple Tropical Fusion
If you want your Ninja Creami coconut ice cream to taste like a tropical vacation, add crushed pineapple to the base mixture before freezing. The natural sweetness of pineapple balances the creaminess of coconut, creating a piña colada-inspired treat. You can also mix in shredded coconut for a chewy surprise.
Chocolate Coconut Creami Swirl
For chocolate lovers, melt dark chocolate and drizzle it into the processed ice cream using the “Mix-In” function. This creates a marbled swirl that pairs beautifully with coconut. Alternatively, add 2 tablespoons of cocoa powder to the base before freezing for a chocolate-coconut hybrid flavor.
These variations prove that Ninja Creami coconut ice cream isn’t just a dessert—it’s a canvas for creativity. Whether you’re in the mood for tropical fruit, chocolate indulgence, or a nutty vegan twist, the options are endless.
Tips for Perfect Ninja Creami Coconut Ice Cream Every Time
Even though the Ninja Creami makes the process simple, a few tips can take your coconut ice cream to the next level:
- Use Full-Fat Coconut Milk – This guarantees creaminess. Low-fat options tend to create icy textures.
- Chill Ingredients Before Mixing – Cold ingredients freeze better, leading to smoother results.
- Don’t Skip the Freeze Time – A full 24 hours in the freezer ensures the mixture solidifies properly.
- Respin if Needed – If your first blend looks crumbly, the “Re-Spin” button works wonders.
- Experiment with Flavors – Add vanilla bean paste, cinnamon, or nutmeg for subtle enhancements.
- Balance Sweetness – Taste your base mixture before freezing to adjust sugar levels to your liking.
By following these simple tricks, you’ll always achieve scoop-shop-quality Ninja Creami coconut ice cream right at home.
Serving Ideas for Coconut Ice Cream
Ninja Creami coconut ice cream is delicious on its own, but it can also be dressed up for special occasions or creative presentations:
- Tropical Sundae: Top with fresh mango chunks, toasted coconut flakes, and a drizzle of honey.
- Chocolate Lover’s Delight: Add a hot fudge drizzle, mini chocolate chips, and whipped coconut cream.
- Refreshing Float: Place a scoop in sparkling coconut water or ginger ale for a fizzy treat.
- Exotic Dessert Bowl: Pair with sticky rice, grilled pineapple, or lychee fruit for an Asian-inspired twist.
- Classic Cone: Scoop into a crispy waffle cone and sprinkle with roasted nuts.
These serving ideas highlight how versatile Ninja Creami coconut ice cream can be. Whether you keep it simple or turn it into a gourmet dessert, it always satisfies.
Storage and Shelf Life of Ninja Creami Coconut Ice Cream
- Proper Storage
- Transfer leftovers back into the Ninja Creami pint after processing.
- Cover tightly with the lid to prevent freezer burn.
- Keep stored in the freezer until ready to enjoy.
- Best Consumption Window
- For ideal flavor and texture, consume within 1–2 weeks.
- Homemade versions lack preservatives, so they don’t last as long as store-bought ice cream.
- Reviving Texture
- If the ice cream becomes too firm after refreezing, simply reprocess it in the Ninja Creami.
- This brings back the creamy consistency without changing the taste.
- Handling Fresh Fruit Add-ins
- Avoid adding fresh fruit before freezing; it can create excess ice crystals.
- Instead, mix in fruits like mango, pineapple, or berries just before serving for better texture.
- Shelf Life vs. Store-Bought Ice Cream
- Store-bought ice cream often lasts longer due to added preservatives.
- Ninja Creami coconut ice cream has a shorter shelf life, but offers a fresher, more natural taste.
Following these storage tips ensures your Ninja Creami coconut ice cream stays creamy, flavorful, and enjoyable until the last scoop.
Common Mistakes to Avoid
Even though making Ninja Creami coconut ice cream is simple, a few common mistakes can impact the final result:
- Using Light Coconut Milk – This leads to an icy, less creamy texture.
- Skipping the 24-Hour Freeze – The base won’t solidify properly, affecting creaminess.
- Overloading with Add-ins – Too many mix-ins can make the texture uneven.
- Not Tasting the Base First – Once frozen, it’s harder to adjust sweetness.
- Improper Storage – Leaving it uncovered in the freezer can cause freezer burn.
By being mindful of these mistakes, you’ll ensure your Ninja Creami coconut ice cream turns out perfectly every single time.
FAQs
1. Can I use light coconut milk instead of full-fat?
Yes, you can use light coconut milk, but the results won’t be as creamy. Light versions have less fat and more water, which can lead to an icy texture. For the richest, smoothest ice cream, full-fat coconut milk or coconut cream is best. The fat helps create a stable, creamy base that mimics traditional dairy ice cream.
2. How long should I freeze the base before processing?
It’s recommended to freeze your coconut ice cream base for at least 24 hours before processing in the Ninja Creami. This ensures the mixture solidifies fully, allowing the machine to shave and blend it into a smooth consistency. Freezing for less time may leave soft spots that affect the texture.
3. Can I make sugar-free Ninja Creami coconut ice cream?
Absolutely! For a sugar-free version, use alternatives like stevia, monk fruit, or erythritol. These sweeteners don’t spike blood sugar and still provide a pleasant sweetness. Just note that some sugar substitutes may slightly alter texture or sweetness level, so adjust to taste.
4. What are the best mix-ins for coconut ice cream?
Coconut pairs wonderfully with tropical and rich flavors. Great mix-ins include:
- Pineapple for a Piña Colada vibe
- Mango for a refreshing tropical touch
- Chocolate chips or chunks for a decadent twist
- Shredded coconut for added texture
- Chopped nuts like almonds, cashews, or macadamias for crunch
5. How do I fix crumbly ice cream after processing?
If your ice cream comes out crumbly or powdery, don’t worry—it’s a common issue. Simply use the “Re-Spin” function on the Ninja Creami. This reprocesses the base to achieve a creamier texture. You can also add a splash of coconut milk or cream before re-spinning to boost smoothness.
Conclusion
Ninja Creami coconut ice cream is certainly something more than dessert; it is an experience that invokes tropical flavor, creamy consistency, and customizable options. Pretty much with a handful of simple ingredients-coconut milk, natural sweeteners, optional add-ons; you can prepare a dessert that suits your taste and dietary needs.
In contrast to the store-bought version, the homemade Ninja Creami coconut ice-cream does not have preservatives, process sugars, or artificial stabilizers. Instead, you’ll get nothing short of pure flavor form and endless variations, whether craving vegan, tropical pineapple fusion, or decadent chocolate swirl.
This is indeed a pain-saving device in ice cream making, producing great results at home. By storing properly, waiting just a bit, and, of course, using a little creativity, one is rewarded with beautiful, creamy scoops of their favorite flavor whenever a craving hits.
So, the next time you’re in the mood for something frozen, visit the store and skip the tubs. Make your very own Ninja Creami coconut ice cream. Healthier, tastier, and far more rewarding all around.
For more inspiration on coconut-based recipes and healthy desserts, check out Healthline’s guide to coconut milk benefits.
Print
Ninja Creami Coconut Ice Cream Recipe
- Prep Time: 10 minutes
- Rest Tiime: 24 hours
- Total Time: 10 minutes (24 hours freezing)
- Yield: 1 pint (about 4 servings) 1x
- Category: Dessert
- Method: No-Bake / Chilled
- Cuisine: Tropical / Dairy-Free
- Diet: Vegan
Description
Ninja Creami coconut ice cream is a creamy, dairy-free dessert made with simple ingredients like coconut milk, natural sweetener, and vanilla. With just a few steps—mix, freeze, and process—you can create a smooth, tropical treat at home. It’s customizable with mix-ins like fruit, nuts, or chocolate, making it perfect for any occasion.
Ingredients
- 1 can (13.5 oz) full-fat coconut milk
- ½ cup natural sweetener (maple syrup, honey, or agave)
- 1 tsp vanilla extract
- Optional: shredded coconut, fruit chunks, or chocolate chips
Instructions
- Prepare the Base – In a mixing bowl, whisk together coconut milk, sweetener, and vanilla until smooth.
- Freeze – Pour into the Ninja Creami pint container. Freeze for at least 24 hours.
- Process – Insert the frozen pint into the Ninja Creami. Select Ice Cream function.
- Adjust Texture – If crumbly, press Re-Spin. Add a splash of coconut milk if needed.
- Add Mix-Ins – Fold in fruit, nuts, or chocolate using the Mix-In function.
- Serve & Enjoy – Scoop into bowls or cones and garnish with toasted coconut.
Notes
- For best results, always use full-fat coconut milk to achieve a rich and creamy texture.
- Freeze the base for a full 24 hours before processing in the Ninja Creami.
- If the ice cream turns out crumbly, use the Re-Spin function or add a splash of coconut milk to smooth it out.
- Store leftovers in the freezer and reprocess before serving for a freshly churned taste.
Nutrition
- Serving Size: ½ cup (about 1 scoop)
- Calories: 230kcal
- Sugar: 15g
- Sodium: 20mg
- Fat: 18g
- Saturated Fat: 16g
- Unsaturated Fat: 2g
- Carbohydrates: 17g
- Fiber: 2g
- Protein: 2g