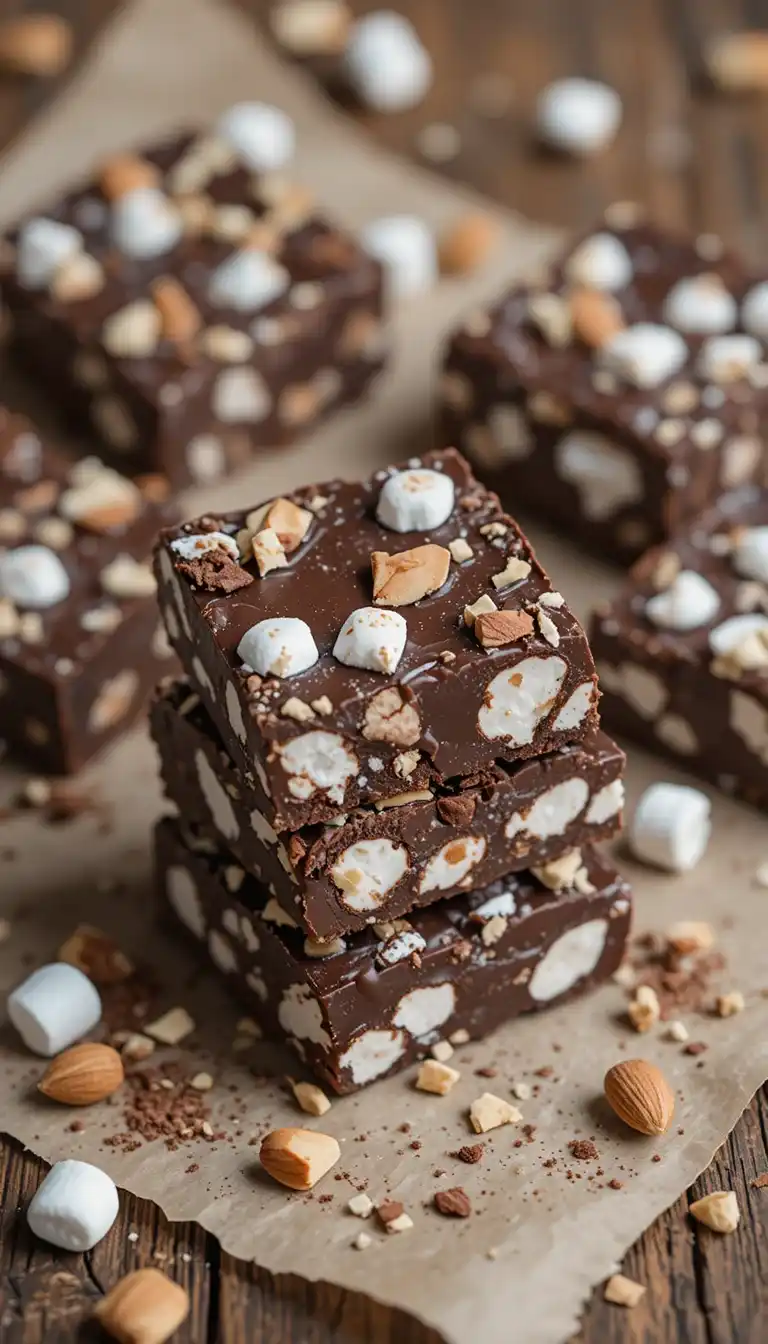
The marshmallow rocky road squares recipe is a timeless dessert that combines chocolate, marshmallows, and crunchy mix-ins into one irresistible bite. Loved for its chewy texture and rich flavor, this no-bake treat is simple enough for beginners yet impressive enough for gatherings. It’s the kind of dessert that disappears quickly at parties.
What makes this recipe special is its balance. The creamy melted chocolate coats fluffy marshmallows and crunchy nuts, creating layers of texture in every square. Because it requires no oven time, it’s perfect for busy schedules or warm weather baking.
Throughout this guide, readers will discover detailed instructions, expert tips, creative twists, and storage solutions. By the end, they’ll feel confident making bakery-quality rocky road squares at home without stress.
What Are Marshmallow Rocky Road Squares?
Marshmallow rocky road squares are a no-bake dessert made from melted chocolate mixed with marshmallows and crunchy additions like nuts or biscuits. Once pressed into a pan and chilled, the mixture firms into sliceable squares.
Historically, rocky road desserts became popular due to their simple preparation and satisfying texture contrast. The name “rocky road” refers to the uneven surface created by marshmallows and nuts peeking through chocolate.
These squares stand out because they:
- Require minimal cooking skill
- Set in the refrigerator
- Deliver rich chocolate flavor
- Offer customizable ingredients
The marshmallow rocky road squares recipe remains popular today because it adapts easily to modern tastes. Whether someone prefers dark chocolate or adds dried fruit, the base formula remains dependable and delicious.
Why This Marshmallow Rocky Road Squares Recipe Works
This recipe succeeds because it focuses on balance and simplicity. First, high-quality chocolate provides the foundation. Second, mini marshmallows distribute evenly for consistent texture. Finally, the correct chilling time ensures clean slicing.
Additionally, this marshmallow rocky road squares recipe:
- Requires fewer than 10 ingredients
- Takes under 20 minutes of active prep
- Doesn’t require baking
- Can be made ahead
Moreover, it’s budget-friendly. Many ingredients are pantry staples, making it ideal for last-minute desserts. With proper technique, anyone can achieve smooth chocolate coating and evenly distributed fillings.
Because it’s forgiving, even small mistakes won’t ruin the result. That reliability makes it a trusted recipe in many households.
Ingredients Overview
The beauty of this dessert lies in its simplicity. Each ingredient serves a purpose.
Core Ingredients:
- 400g semi-sweet chocolate
- 2 cups mini marshmallows
- 1 cup chopped nuts (almonds or walnuts)
- 1 cup crushed biscuits or graham crackers
- 2 tablespoons butter
- 1 teaspoon vanilla extract
- Pinch of salt
The chocolate binds everything together. Marshmallows provide softness. Nuts add crunch. Biscuits create structure. Butter enhances smoothness, while vanilla deepens flavor.
Choosing the Best Chocolate
High-quality chocolate makes a noticeable difference. Semi-sweet works best because it balances sweetness from marshmallows. Dark chocolate creates richer flavor, while milk chocolate produces a sweeter treat.
When selecting chocolate:
- Choose bars over chips for smoother melting
- Look for 50–70% cocoa
- Avoid chocolate with excess additives
Marshmallows and Mix-Ins
Mini marshmallows work better than large ones. They distribute evenly and create consistent texture.
Other mix-in ideas include:
- Dried cranberries
- Toasted coconut
- Peanut butter chips
- Pretzels
Balance is key. Too many additions may prevent proper setting.
Kitchen Tools Needed
Preparation requires only basic kitchen tools:
- 8×8 inch baking pan
- Parchment paper
- Heatproof bowl
- Saucepan (for double boiler method)
- Silicone spatula
- Sharp knife
Using parchment ensures easy removal. A silicone spatula helps fold gently without crushing marshmallows.
Step-by-Step Instructions
Preparing the Pan
Line the baking pan with parchment paper, leaving overhang on two sides. This allows easy lifting once set. Lightly grease the parchment for smooth release.
Melting the Chocolate
Melt chocolate and butter using a double boiler method:
- Fill a saucepan with 1–2 inches of water.
- Place heatproof bowl on top without touching water.
- Stir chocolate gently until smooth.
- Remove from heat and stir in vanilla and salt.
Alternatively, microwave in 30-second intervals, stirring between each.
Mixing and Setting
Allow chocolate to cool slightly for 2–3 minutes. Then:
- Fold in marshmallows
- Add nuts and biscuits
- Stir until evenly coated
Transfer mixture into prepared pan. Press gently with spatula to level surface. Refrigerate for at least 2 hours until firm.
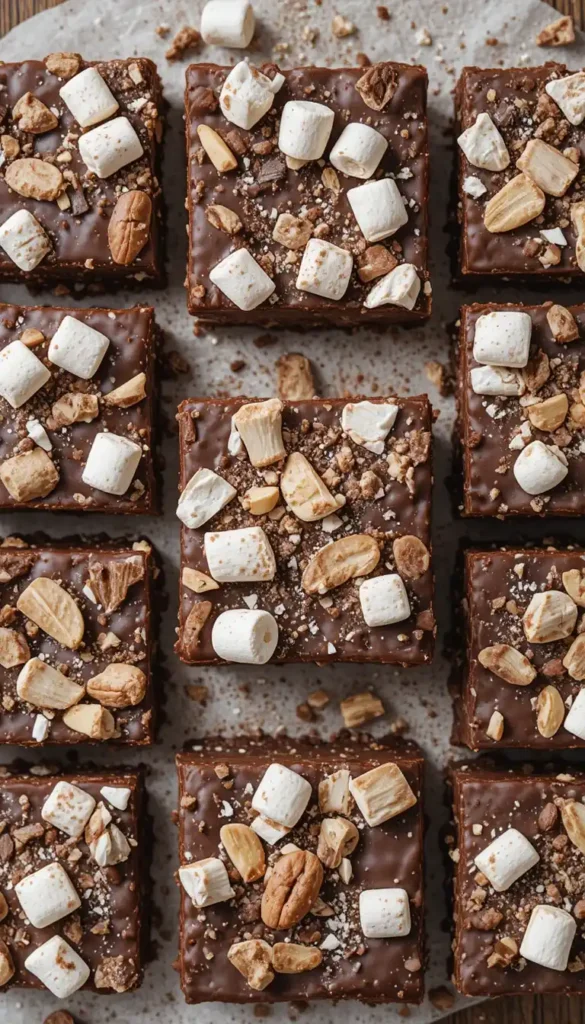
Once set, lift from pan and slice into squares.
Pro Tips for Perfect Results
To elevate this marshmallow rocky road squares recipe:
- Let melted chocolate cool slightly before adding marshmallows to prevent melting them
- Toast nuts for enhanced flavor
- Chill fully before slicing
- Use a warm knife for clean edges
Consistency matters. If mixture seems too thick, add a tablespoon of melted butter.
Creative Variations
This recipe welcomes creativity. Consider these options:
Peanut Butter Rocky Road
Add 2 tablespoons peanut butter to melted chocolate.
Holiday Version
Mix in red and green candies for festive color.
Salted Caramel Twist
Drizzle caramel before chilling.
White Chocolate Version
Substitute half the chocolate with white chocolate for contrast.
Because it’s flexible, the marshmallow rocky road squares recipe adapts to personal taste effortlessly.
Storage and Shelf Life
Store squares in an airtight container in the refrigerator for up to one week. Separate layers with parchment to prevent sticking.
For longer storage:
- Freeze up to 2 months
- Thaw in refrigerator before serving
Avoid leaving at room temperature for extended periods, especially in warm climates.
Serving Suggestions
These squares shine in many settings:
- Birthday parties
- Bake sales
- Holiday platters
- Afternoon tea
For presentation, dust lightly with cocoa powder or drizzle melted chocolate on top.
Pair with coffee or milk for a balanced treat.
Nutritional Information (Approximate per square)
| Nutrient | Amount |
|---|---|
| Calories | 210 |
| Fat | 13g |
| Carbs | 22g |
| Sugar | 17g |
| Protein | 3g |
Values vary depending on ingredients used.
Common Mistakes to Avoid
Even simple recipes require attention.
- Overheating chocolate causes grainy texture
- Adding marshmallows too early melts them
- Not chilling long enough leads to messy slices
- Using too many mix-ins prevents binding
By following instructions carefully, success is almost guaranteed.
Frequently Asked Questions
1. Can this recipe be made without nuts?
Yes, this recipe can easily be made without nuts. Simply omit them or replace them with extra crushed biscuits, pretzels, or dried fruit. The texture will still be deliciously chewy and crunchy. Removing nuts also makes the recipe allergy-friendly, which is helpful for school events or gatherings where dietary restrictions must be considered.
2. Why didn’t my squares set properly?
If the squares didn’t set, the chocolate mixture may not have been chilled long enough or too many mix-ins were added. The chocolate needs adequate time in the refrigerator to firm up completely. Also, excessive marshmallows or add-ins can prevent proper binding. Ensuring correct ingredient ratios helps achieve clean, firm slices.
3. Can milk chocolate be used?
Yes, milk chocolate can be used instead of semi-sweet or dark chocolate. However, the final result will be sweeter and slightly softer. If using milk chocolate, consider reducing marshmallows slightly to balance sweetness. High-quality chocolate is recommended to maintain smooth texture and rich flavor in the finished squares.
4. How long should it chill?
The mixture should chill for at least 2 hours, though 3 hours is ideal for firm slicing. Proper chilling allows the chocolate to solidify evenly, making the squares easier to cut cleanly. If the kitchen is warm, extra refrigeration time may be necessary to ensure the dessert sets fully and maintains its structure.
5. Can it be made dairy-free?
Yes, this recipe can be made dairy-free by using plant-based butter and dairy-free chocolate. Many high-quality dairy-free chocolate brands melt smoothly and taste rich. Always check ingredient labels to ensure marshmallows are also dairy-free. The texture and flavor remain satisfying even with substitutions.
6. Can large marshmallows be used?
Large marshmallows can be used, but they should be cut into smaller pieces before mixing. Smaller pieces distribute more evenly throughout the chocolate mixture, ensuring consistent texture in every bite. Mini marshmallows are preferred because they save preparation time and create a more balanced appearance.
Conclusion
The marshmallow rocky road squares recipe remains a dependable dessert choice because it’s easy, adaptable, and incredibly satisfying. With minimal effort, anyone can create a treat that looks impressive and tastes indulgent. From family gatherings to festive celebrations, it never disappoints.
For additional chocolate inspiration, readers can explore more dessert ideas at BBC Good Food: https://www.bbcgoodfood.com/
Ultimately, this recipe proves that simple ingredients can create unforgettable results. Once made, it often becomes a repeat favorite.
Print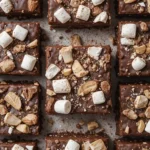
Marshmallow Rocky Road Squares Recipe
- Prep Time: 15 minutes
- Cook Time: 5 minutes
- Total Time: 20 minutes
- Yield: 16 squares 1x
- Category: Dessert
- Method: No bake
- Cuisine: American
- Diet: Vegetarian
Description
This marshmallow rocky road squares recipe is a rich, chewy, no-bake dessert made with smooth melted chocolate, fluffy marshmallows, crunchy nuts, and crushed biscuits. It’s quick to prepare, requires simple pantry ingredients, and sets beautifully in the refrigerator. Perfect for holidays, parties, or an easy make-ahead treat, these squares deliver the ideal balance of sweetness and texture in every bite.
Ingredients
- 400g semi-sweet chocolate, chopped
- 2 tablespoons butter
- 2 cups mini marshmallows
- 1 cup chopped almonds or walnuts
- 1 cup crushed graham crackers or digestive biscuits
- 1 teaspoon vanilla extract
- Pinch of salt
Instructions
- Line an 8×8-inch baking pan with parchment paper, leaving overhang for easy removal.
- Melt chocolate and butter using a double boiler or microwave in 30-second intervals, stirring until smooth.
- Remove from heat and stir in vanilla extract and salt.
- Let chocolate cool slightly for 2–3 minutes.
- Fold in marshmallows, chopped nuts, and crushed biscuits until evenly coated.
- Transfer mixture to prepared pan and press gently to level.
- Refrigerate for at least 2 hours until fully set.
- Lift from pan and cut into squares using a sharp knife.
Notes
- Allow chocolate to cool slightly before adding marshmallows to prevent melting.
- Toast nuts for enhanced flavor.
- For cleaner slices, warm the knife under hot water and wipe dry before cutting.
- Store in an airtight container in the refrigerator for up to 1 week.
- Freeze up to 2 months for longer storage.